Chapter 8.5 Vaginal Hysterectomy
GENERAL PRINCIPLES
Definition
■ Total vaginal hysterectomy is an operation that can be performed when
removal of the uterus is indicated in cases of either benign disease or
carcinoma in situ of the cervix.
■ Vaginal hysterectomy is most often performed in cases of pelvic pain,
abnormal uterine bleeding, or uterovaginal prolapse.
PREOPERATIVE PLANNING
■ The preoperative health assessment for any hysterectomy includes a
complete history and physical examination. There is no routinely
recommended imaging, cardiopulmonary testing, or laboratory tests. This
type of testing is ordered for patients based on their medical comorbidities.
Many hospitals have their own requirements for preoperative assessments,
which are often based on the patient’s age in combination with their
medical comorbidities and frailty.
■ A normal Papanicolaou (Pap) smear should be documented before
hysterectomy. In patients who are at risk for endometrial cancer,
endometrial sampling should also be obtained. If cancer or an adnexal mass
or cyst is suspected, a transvaginal ultrasound is necessary.
■ Careful review of a patient’s medication list is important before performing
a hysterectomy. Because of the increased risk of bleeding due their
antiplatelet effects, all nonsteroidal anti-inflammatory drugs and aspirin
should be stopped at least 7 days before surgery. Multivitamins containing
vitamin E should also be discontinued 10 to 14 days before surgery.
Because of the increased risk of venous thromboembolic events, oral
contraceptive pills and hormone replacement therapies should ideally be
stopped 4 to 6 weeks before surgery. This may be challenging in women
who are on hormone therapies for abnormal bleeding, but cessation should
be considered.
■ Before proceeding with hysterectomy, assessment of a patient’s risk for
intra- or postoperative anemia and need for autologous blood products is
necessary. This is especially important for patients with abnormal uterine
bleeding and baseline anemia. These patients should also be evaluated for
preoperative iron supplementation or transfusion.■ Informed consent should be obtained in the office. Patients should be well
informed of the risks and benefits of the procedure, as well as the
alternatives to hysterectomy. Most importantly, confirmation of completion
of childbearing must be done.
■ Prior to surgery, a pregnancy test is necessary in all patients of
reproductive age.
■ Hysterectomy is a clean-contaminated procedure, and prophylactic
intravenous antibiotics should be ordered, to be administered within 60
minutes of incision time. First- or second-generation cephalosporins are
first-line antibiotics.
■ All patients undergoing hysterectomy are considered “moderate risk” and
require venous thromboembolism prophylaxis. In most patients, either lowdose unfractionated heparin, low–molecular-weight heparin, or intermittent
pneumatic compression devices are recommended. In higher-risk patients,
dual prophylaxis, and in some cases, postoperative prophylaxis may be
necessary.
■ Route of hysterectomy is dependent on the following factors: vaginal
caliber and accessibility to the uterus, uterine size and shape, uterine
mobility, cancer and extrauterine disease, surgeon skillset, available
support facilities, and surgeon and patient preference.
■ A thorough bimanual examination is necessary prior to deciding on route of
hysterectomy. Care should be taken to note the following factors to help
determine the degree of difficulty that will be present in performing the
procedure: the size, mobility, and descent of the uterus; the size and shape
of the bony pelvis (a pubic arch of less than 90 degrees may preclude a
vaginal hysterectomy whereas a wide angle will facilitate the approach);
the caliber of the introitus and the vagina.
SURGICAL MANAGEMENT
■ According to the American College of Obstetricians and Gynecologists
(ACOG),1 vaginal hysterectomy is the safest and most cost-effective method
to remove the uterus for noncancerous reasons. In general, based on current
data, vaginal hysterectomy is associated with better outcomes and fewer
complications.
■ There are few absolute contraindications to the vaginal approach for
hysterectomy; however, there are factors that generally preclude this
approach, including (1) the suspicion of malignancy; (2) the presence of
known extrauterine disease or adnexal disease; (3) a narrow pubic arch
(<90 degrees); (4) a narrow vagina (narrower than 2 fingerbreadths,
especially at the apex); and (5) a fixed, immobile uterus. In the absence of
one of these factors, vaginal hysterectomy should be the approach of choicewhenever feasible given its well-documented advantages.
■ There are some conditions and patient-specific characteristics that can make
vaginal hysterectomy technically challenging. These factors are not
contraindications to vaginal hysterectomy, but should be identified
preoperatively and anticipated at the time of surgery.
■ These conditions include the enlarged or undescended uterus, previous
cesarean sections, and uterine prolapse. These factors should be taken into
consideration during surgical planning, and while they may make the
procedure more challenging, can be overcome with a few helpful pearls
that we will review in this chapter.
Positioning
■ Patients are positioned in dorsal lithotomy position using either candy cane
stirrups (Fig. 8.5.1), or yellow fin stirrups (Fig. 8.5.2). Patients should be
positioned so that the edge of the buttocks is at the edge of the surgical
table. Care is taken not to hyperflex or extend the legs in order to avoid
postoperative neuropathies. Foam can be used to pad the bony prominences
of the limbs, and also to fill dead space in the stirrups. The arms can be left
out at the sides, and are positioned in anatomic position with care taken to
not hyperextend the limbs to avoid brachial plexus injuries.

Figure 8.5.1. Dorsal lithotomy positioning using candy cane stirrups.

Figure 8.5.2. Dorsal lithotomy positioning using yellowfin stirrups.
Approach
■ The procedure is performed transvaginally.Procedures and Techniques (Video 8.5)
Preparation
■ Once the patient is positioned, the vulva and vagina are fully prepped with
betadine or a surgical soap solution.
■ The patient is draped in a sterile fashion.
■ A Foley catheter is placed and can be left to continuous drainage for the case, or
it can be clamped off and intermittently emptied throughout the case.
Tenaculum placement and injection
■ A short-weighted retractor is placed in the vagina, exposing the cervix.
■ A small right-angle retractor is used to elevate the anterior vaginal wall and a
second right-angle retractor displaces one lateral vaginal wall and exposes the
cervix.
■ Two single-tooth tenacula are placed in a vertical fashion at the 3 and 9 o’clock
positions of the cervix through the full thickness of the stroma. Alternatively, two
single-tooth tenacula such as a Jacobs tenaculum can be applied to the midanterior and posterior lips of the cervix (Tech Fig. 8.5.1).
■ Gentle traction is applied to the tenacula and approximately 10 cc of local
anesthetic with a dilute vasoconstricting agent (we recommend using 0.5%
lidocaine with 1:200,000 units epinephrine) is injected circumferentially beneath
the vaginal epithelium at its junction with the cervix. This creates a
hydrodissection plane for the colpotomy and helps with hemostasis as well.

Tech Figure 8.5.1. Sagittal view of the pelvic organs. Positioning of the retractors at 12
and 6 o’clock and placement of two single-tooth tenacula on the cervix at the start of a
vaginal hysterectomy. Reprinted with permission, Cleveland Clinic Center for Medical
Art & Photography © 2015, all rights reserved.
Colpotomy and entry into the posterior cul-de-sac
■ A scalpel or Bovie cautery can be used to create the colpotomy. A
circumferential incision is made in the vaginal epithelium until the cervical stroma
in reached (Tech Figs. 8.5.2 and 8.5.3). The incision should stay above the
pubovesical cervical fascia anteriorly and the perirectal fascia posteriorly. Rightangle retractors can be placed at the 3 and 9 o’clock positions to help protect the
vaginal sidewalls while the incision is made. Curved Mayo scissors are then used
to dissect the vagina off of the cervical stroma anteriorly and posteriorly. Traction
on the cervix should be maintained during this dissection to avoid injury to the
surrounding viscera and to help identify the correct dissection planes.
■ The tenacula are then pulled upwards toward the pubic bone until the posterior
peritoneum of the cul-de-sac is identified. The peritoneum is grasped and tented
away from the cervix and then entered sharply with the curved Mayo scissors
(Tech Figs. 8.5.4 and 8.5.5). Confirmation of entry is made by visualization
and/or palpation.
■ A finger is placed in the cul-de-sac, and the short-weight retractor is removed
and replaced with a long-billed weighted retractor (Tech Fig. 8.5.6).

Tech Figure 8.5.2. Cervical incision; initial colpotomy. Reprinted with permission,
Cleveland Clinic Center for Medical Art & Photography © 2015, all rights reserved.

Tech Figure 8.5.3. Cervical incision; initial colpotomy.

Tech Figure 8.5.4. Entry into the posterior cul-de-sac. Reprinted with permission,
Cleveland Clinic Center for Medical Art & Photography © 2015, all rights reserved.

Tech Figure 8.5.5. Entry into the posterior cul-de-sac.

Tech Figure 8.5.6. Placement of a long weighted retractor into the posterior cul-de-sac.
Reprinted with permission, Cleveland Clinic Center for Medical Art & Photography ©
2015, all rights reserved.
Suture ligation of the uterosacral ligaments
■ Many providers enter the anterior cul-de-sac before ligating the uterosacral
pedicles. We believe that suture ligation of the uterosacral ligaments prior to
anterior entry facilitates descent of the uterine specimen, making it easier to
identify the vesicouterine reflection, and decreasing the risk of injury to the
bladder at the time of anterior entry.
■ The cervix is placed on upward and lateral retraction using the tenacula. A curved
Heaney clamp is placed in the posterior cul-de-sac with one blade underneath
the uterosacral ligament and the opposite blade over the uterosacral ligament
(Tech Fig. 8.5.7). In order to prevent possible ureteral injury, it is important to place
the clamp along the uterine cervix so that some tissue of the cervix is included in
this clamp.
■ A curved Mayo scissor is used to transect the pedicle and a No. 0 polyglactin
suture is used to tie off of the pedicle before releasing the clamp. A Heaneyfixation stitch of No. 0 polyglactin is used for all pedicles (Tech Figs. 8.5.8 and
8.5.9). The uterosacral ligaments are suture ligated bilaterally using this method.
■ If there is oozing of blood at the posterior vaginal cuff, the posterior peritoneum
can be reefed to the vaginal epithelium between the uterosacral pedicles using a
No. 2-0 or 0 polyglactin suture in a running locked fashion.

Tech Figure 8.5.7. Clamping of the right uterosacral ligament.

Tech Figure 8.5.8. Clamping, transection, and suture ligation of the uterosacral
ligament. Reprinted with permission, Cleveland Clinic Center for Medical Art &
Photography © 2015, all rights reserved.

Tech Figure 8.5.9. Suture ligation of the right uterosacral ligament.
Entry into the anterior cul-de-sac
■ Downward traction is applied to the cervix and the anterior vaginal epithelium and
underlying bladder are dissected off of the cervix and lower uterine segment.
■ A right-angle retractor is placed under the vaginal epithelium and is used to
elevate the bladder to help facilitate dissection (Tech Fig. 8.5.10).
■ Anterior dissection is carried all the way to the vesicouterine peritoneal reflection.
This is considered by many to be one of the most challenging steps of the
vaginal hysterectomy. However, if dissection is not carried up to the vesicouterine
fold, entry into the anterior cul-de-sac will be very challenging, and there is an
increased risk of injury to the bladder. The right-angle retractor can then be
placed underneath the bladder to better visualize the vesicouterine fold, which
appears like a thin white transverse line across the lower uterine segment.
■ With downward traction on the cervix, the vesicouterine fold is tented upwards
with pickup forceps and it is entered using the curved Mayo scissors (Tech Figs.
8.5.11 and 8.5.12).
■ A finger is immediately placed in the incised hole and explored to ensure that
there is no injury to the bladder. The bladder can be identified by palpating the
bulb of the Foley catheter. A right-angle retractor is then placed beneath the
finger and passed into the anterior cul-de-sac (Tech Figs. 8.5.13 and 8.5.14).

Tech Figure 8.5.10. Dissection of the bladder off of the anterior cervix. Reprinted with
permission, Cleveland Clinic Center for Medical Art & Photography © 2015, all rights
reserved.

Tech Figure 8.5.11. Entry into the anterior cul-de-sac. Reprinted with permission,
Cleveland Clinic Center for Medical Art & Photography © 2015, all rights reserved.

Tech Figure 8.5.12. Entry into the anterior cul-de-sac.

Tech Figure 8.5.13. Placement of a right-angle retractor into the anterior cul-de-sac.
Reprinted with permission, Cleveland Clinic Center for Medical Art & Photography ©
2015, all rights reserved.
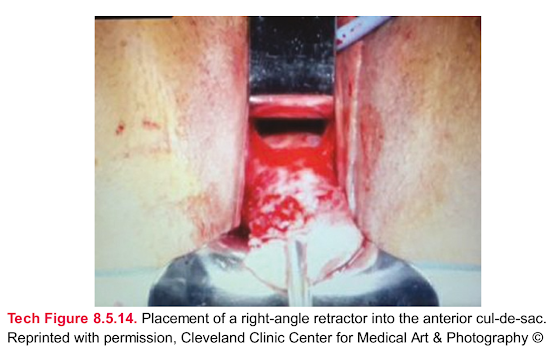
Tech Figure 8.5.14. Placement of a right-angle retractor into the anterior cul-de-sac.
Reprinted with permission, Cleveland Clinic Center for Medical Art & Photography ©2015, all rights reserved.
Suture ligation of the cardinal ligaments and uterine vessels
■ Upward and lateral traction is applied to the cervix and staying as close to the
cervix as possible, a Heaney clamp is applied to the cardinal ligament (Tech Fig.
8.5.15), which is transected with the curved Mayo scissor and then suture ligated
(Tech Fig. 8.5.16). This procedure is performed bilaterally.
■ The remaining portion of the broad ligament attached to the lower uterine
segment containing the uterine artery is clamped adjacent to the cervix and
suture ligated bilaterally. A Heaney fixation suture can be performed on this
pedicle, but caution should be taken to avoid placing the needle directly through
the vascular portion of the pedicle, which can create a hematoma. In addition,
great care should be taken to hug the cervix and lower uterine segment to avoid
lateral placement of the clamps and possible injury to the ureters.

Tech Figure 8.5.15. Clamping of the left cardinal ligament.
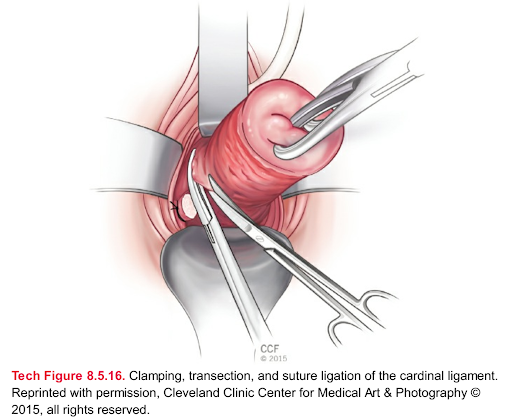
Tech Figure 8.5.16. Clamping, transection, and suture ligation of the cardinal ligament.
Reprinted with permission, Cleveland Clinic Center for Medical Art & Photography ©
2015, all rights reserved.
Suture ligation of the utero-ovarian pedicles
■ Once all of the pedicles are suture ligated, and the cornua of the uterus are
reached, the cervix is retracted upwards and tenacula or towel clamps are
sequentially placed in a “hand over hand” fashion on the uterine segment until the
fundus of the uterus can be delivered posteriorly (Tech Figs. 8.5.17 and 8.5.18).
■ Caution should be taken in applying too much traction at this stage of the
procedure, as the remaining utero-ovarian pedicles can easily be avulsed.
■ A finger is placed under the utero-ovarian pedicle and round ligament and a
Heaney clamp is then passed along the path of the finger and used to clamp the
pedicle. A second Heaney clamp is then placed alongside the first, and the
pedicle is double suture ligated (Tech Figs. 8.5.19 to 8.5.21).
■ The uterus and cervix are then removed from the peritoneal cavity and can be
passed off the surgical field.

Tech Figure 8.5.17. Fundus of the uterus delivered posteriorly. Reprinted with
permission, Cleveland Clinic Center for Medical Art & Photography © 2015, all rights
reserved.

Tech Figure 8.5.18. Fundus of the uterus delivered posteriorly.

Tech Figure 8.5.19. Right utero-ovarian ligament clamped.

Tech Figure 8.5.20. Right utero-ovarian ligament suture ligated.

Tech Figure 8.5.21. Clamping, transection, and suture ligation of the utero-ovarian
ligaments. Reprinted with permission, Cleveland Clinic Center for Medical Art &
Photography © 2015, all rights reserved.
Salpingo-oophorectomy
■ Removal of the fallopian tubes and ovaries is not always performed at the time of
vaginal hysterectomy, but is sometimes indicated. There are two techniques
commonly used to perform this procedure. Both techniques can be done once
the uterus has been removed.
■ First, the small bowel is packed with a tagged moist laparotomy sponge. A
sponge stick can also be used, but can sometimes get in the way of the
operative field. Vaginal retractors are placed at 12 and 6 o’clock to facilitate
visualization. A third retractor is placed at either 3 or 9 o’clock, depending on
which ovary is the target, in order to retract the contralateral ovary and tube out of
the way.
■ The first technique involves placing downward traction on the fallopian tube and
ovary using an Allis or Babcock clamp in order to identify the infundibulopelvic
ligament. Once this is done, one or two Heaney clamps are passed around the
ovarian blood supply and the pedicle is transected. This pedicle is then ligated
using a free tie followed by a suture. In some cases, a vessel sealing device
such as the Ligasure (Valleylab, Boulder, CO) can be used to ligate and seal thepedicle.
■ A second technique can be used to isolate the ovarian blood supply by
dissecting between the round ligament and the infundibulopelvic ligament. This
technique can be done once the uterus is removed, but it can also be done with
one side of the uterus separated from the adnexa, and the other remaining
attached via the utero-ovarian ligament, which is what we will describe in this
section. The technique is similar to what is usually done abdominally to perform
an oophorectomy, but requires a good grasp of anatomy when it is performed
transvaginally. The round ligament is clamped, cut, and suture ligated, and the
pedicle is retracted laterally. The broad ligament and mesosalpinx are then
sharply dissected laterally and cephalad until the infundibulopelvic ligament is
isolated and the ovarian vessels can be clamped close to the ovary using a
Heaney or long Kelly clamp. These are cut and suture ligated. Of note, the Bovie
cautery can be used to open the round ligament and perform the dissection of
the mesosalpinx. This is sometimes helpful in maintaining hemostasis as these
tissues are often very delicate and friable. With this in mind, gentle handling of
the tissues is very important. Once the infundibulopelvic ligament pedicle is
ligated, the specimen (containing the uterus and cervix and one of the fallopian
tubes and ovaries) can be passed off. With exposure and isolation of the
contralateral round ligament, the contralateral ovary is removed in the same
manner.
Closure of the vaginal cuff
■ The vaginal cuff is sutured with either a running locked stitch or with figure-ofeight stitches using No. 0 or 2-0 polyglactin suture. To maintain vaginal length, a
transverse closure is usually preferable (Tech Fig. 8.5.22).

Tech Figure 8.5.22. Transverse closure of the vaginal cuff. Reprinted with permission,
Cleveland Clinic Center for Medical Art & Photography © 2015, all rights reserved.Pearls and Pitfalls2,3
Obese patients
Position the patient properly to maximize access. The buttocks should be positioned
well beyond the edge of the operating table; this brings the operating field closer to
the surgeon and makes it easier to use long-handled retractors posteriorly.
Adequate surgical assistance is important; if possible, use two surgical assistants,
one on each side. Candy cane stirrups should be used to allow better access for the
assistants.
Minimize Trendelenburg position as it will cause the patient to slide up the bed and
make posterior entry more difficult.
Enlarged uterus (fibroid uterus)
The hysterectomy is performed in the standard fashion. Once the uterine pedicles
are ligated, one of the following techniques can be used to remove the specimen
and gain access to the remaining pedicles: bivalving or hemisection (Fig. 8.5.3),
intramyometrial coring (Fig. 8.5.4), wedge morcellation, myomectomy (Fig. 8.5.5).
When using the above techniques, be sure to keep the serosa of the uterus intact to
maintain orientation. Orient your scalpel blade so that you are always cutting toward
the center of the specimen. Use traction–countertraction while coring or
morcellating; certain clamps like the Lahey thyroid (triple hook) clamp can be useful.
Be sure to replace the scalpel periodically to ensure it remains sharp and work
systematically to remove as much of the central tissue as possible.
Lack of uterine descent
The initial cervical incision can be challenging; the Bovie cautery can be used with
the tip bent at 45 degrees to make the incision easier.
The posterior colpotomy and suture ligation of the uterosacral ligaments should be
done before the anterior colpotomy in order to facilitate some descensus of the
uterus, making anterior access safer and easier.
Once the uterine vessels are ligated, techniques used for the enlarged uterus (see
above) can be used to further access the remaining pedicles.
Consider using a vessel sealing device rather than clamping and suturing. It is
sometimes difficult to place sutures in a tight, poorly illuminated space, so using a
vessel sealer above the uterosacral ligaments is sometimes helpful. Choose a
device that is shaped like a Heaney clamp. There are devices that exist that are
specifically made for vaginal hysterectomy.
If suturing, always use a Heaney needle driver, with the suture loaded in the center
of the needle curve.
Use a disposable fiber-optic lighted suction irrigator to retract redundant tissue away
from the course of the needle when suturing high up in the pelvis.Narrow vaginal opening
A small mediolateral incision can be made starting just above the hymen through the
perineal structures. To reduce blood loss, start by injecting local anesthetic with a
dilute vasoconstricting agent and use the Bovie cautery to make the incision; avoid
injury to the anus and rectum.

Figure 8.5.3. Bivalving the cervix and uterus.

Figure 8.5.4. Intramyometrial coring.

Figure 8.5.5. Myomectomy.
In cases of extreme narrowing, a more extensive Schuchardt incision can be
performed: the mediolateral incision is carried into the ischiorectal fossa and into the
upper part of the vagina.
Avoid over-using sidewall retractors; they can sometimes get in the way and narrow
the surgical field. The tip of the suction catheter can sometimes be used to retract
the vaginal side wall while the surgeon is working.
Difficult anterior entry (previous cesarean section)
Be patient, you do not need to enter anteriorly right away to successfully perform the
procedure.
Enter the posterior cul-de-sac and perform the procedure extraperitoneally; as long
as the bladder is protected, several pedicles can be suture ligated before entering
anteriorly.
Use sharp dissection anteriorly; blunt dissection has a much higher risk of causing
injury/entry into the bladder; never enter anteriorly in a blind fashion, the
vesicouterine space should be well developed and the peritoneum visualized before
entry.
The bladder can be back-filled through the catheter to demarcate the edge of the
bladder and the vesicouterine peritoneal fold. A uterine sound can also be bent and
passed through the urethra and into the bladder to help demarcate the lower
boundary of the bladder.
You can also utilize your posterior access to identify the anterior peritoneal fold. This
is usually possible when the uterus is small and there is descensus; the surgeon’s
fingers can reach around the fundus and identify the peritoneum. In cases of no
descensus, a uterine sound can be bent and passed posteriorly, up and around the
fundus in order to identify the fold.
Difficult posterior entry (endometriosis, cervical fibroid)
Use sharp dissection with good traction–countertraction and clamp pediclesextraperitoneally until safe access is possible. Keep dissection close to the uterus
and use retractors to protect the rectum.
Enter the anterior cul-de-sac if possible and if the uterus is small, deliver the fundus
anteriorly or access the posterior cul-de-sac digitally through the anterior peritoneal
incision.
If a posterior cervical fibroid is obstructing access, attempt intramyometrial coring and
myomectomy to decompress the bulk posteriorly.
Transcervical access to the posterior cul-de-sac is also an option. A tenaculum is
placed on the posterior cervix and traction is applied anteriorly. A retractor is placed
at 6 o’clock over the posterior vagina. A hemostatic agent is injected into the
posterior cervix. A scalpel or curved Mayo scissors are used to perform a fullthickness division of the posterior cervix in the midline starting at the external os and
moving downward until the posterior peritoneum is encountered and can be entered.
Elongated cervix
The biggest challenge in these cases is usually anterior and posterior entries.
Careful examination under anesthesia is necessary. Identification of the area of
transition between the cervix and fundus at the lower uterine segment is important.
The anterior peritoneal fold is usually located at or above this location. The posterior
peritoneal fold is usually more distal. Identification of the distal edge of the bladder is
also important. Sometimes, a vaginal crease is seen. If this is not the case, backfill of
the bladder can be done to identify the demarcation line. A rectal examination can be
done to identify the distal demarcation of the rectum. Once the distal edges of the
rectum and bladder are noted, the circumferential cervical incision can be made,
high enough to avoid extensive dissection on the cervix, but low enough to avoid
injury to viscera.
The above-mentioned techniques can also be used to help gain access into the
anterior and posterior cul-de-sacs.
Uterovaginal prolapse
The biggest challenge with prolapse is that there is often distortion of the anatomy.
The bladder reflection is often very distal on the cervix. Therefore, the initial cervical
incision should be made distally, with care taken to not amputate the cervix.
In cases of severe prolapse, the bladder trigone is often everted which displaces the
ureteral orifices distally, so that they are close to the distal bladder reflection. Careful
dissection of the bladder off of the cervix is key.
The posterior cul-de-sac is often easier to enter in prolapse cases because it lies
behind the upper half or so of the posterior vaginal wall while the distal rectum lies
behind it. The posterior peritoneal incision can be used to access the anterior
peritoneum as described by the techniques above. This can be helpful in avoiding
bladder and ureteral injuries.POSTOPERATIVE CARE
■ Patients may be discharged from the hospital the same day of surgery or
after overnight observation depending upon how quickly they meet their
postoperative milestones, which include the ability to tolerate an oral diet,
good pain control, ability to ambulate and void.
■ In some cases, vaginal packing may be used to decrease the risk of
hematoma formation. This is often done after concurrent prolapse repairs.
Packing must be removed within 24 hours of surgery and before a trial of
void is performed.
■ A Foley catheter may be left in place after surgery and removed once the
patient is ambulating. If the patient is destined to be discharged home the
day of surgery, the catheter may be removed in the operating room or once
the patient is brought to the recovery room.
■ Patients are cautioned against heavy lifting and vigorous activity for 6
weeks. They should also be placed on pelvic rest with nothing in the vagina
for those weeks. They should be examined at that time and allowed to
return to their normal activities as long as the vaginal cuff appears well
healed and intact. In cases of granulation tissue formation or bleeding from
the vaginal cuff, silver nitrate can be applied to help with healing.
OUTCOMES
■ Removal of the uterus results in the cessation of menstrual flow and causes
sterility. In addition, it eliminates any existing cervical or uterine disease.
■ The most significant health benefit of prophylactic oophorectomy is
reduced ovarian cancer risk. It is estimated that approximately 1,000 cases
of ovarian cancer could be prevented each year in the United States if all
women undergoing hysterectomy at 40 years or older had elective salpingooophorectomy performed.4 The level of cancer risk reduction associated
with prophylactic oophorectomy is thought to range from 80% to 95%.
■ While there is well-documented significant reduction in the risk of breast
cancer in women with known hereditary breast cancer syndromes such as
BRCA, it is unclear what the benefit is for nonhereditary breast cancers.
■ Unlike the gradual decline in hormonal function seen with natural
menopause that occurs over years, surgical menopause results in an abrupt
cessation of all ovarian hormone production. It is important to give
thoughtful consideration to this when counseling pre- or perimenopausal
women about prophylactic oophorectomy at the time of vaginal
hysterectomy. Studies show that premature menopause is associated with
an increased risk of cognitive impairment, heart disease, bone fractures,
and shorter long-term survival (not related to cancer). A study by Parker et
al.5 used a Markov decision-analysis model to determine whether theovaries of women aged 40 years or older should be removed during a
hysterectomy for benign disease. The authors found that ovarian
conservation demonstrated a net benefit in overall survival probability (as
defined by reduced heart disease and hip fracture) at age 80, offsetting any
adverse effects of new cases of ovarian and breast cancer. Their survival
curves comparing women with and without ovaries imply that ovarian
conservation up to age 65 in women without a strong personal or family
history of ovarian–breast cancer syndromes may be beneficial.
COMPLICATIONS
■ Complications that occur at the time of or after vaginal hysterectomy can
be directly related to the surgical technique used, associated with
anesthesia, or a result of the patient’s medical comorbidities.
■ Rates of complications vary by route of hysterectomy. Vaginal
hysterectomy is associated with the lowest complication rates, unless
additional surgeries such as prolapse repair are performed concurrently.
The eVALuate trial6 was a multicenter study that compared laparoscopic
and abdominal hysterectomy as well as laparoscopic and vaginal
hysterectomy performed for benign disease. The overall urinary injury rate
(bladder and ureter) was higher in the laparoscopic group; however, the
overall complication rate between the three modes of surgery appeared
similar. The study did show that both laparoscopic and vaginal
hysterectomy (compared to abdominal hysterectomy) were associated with
a quicker recovery time, less pain, improved short-term quality of life, and
shorter hospital stay. However, not surprisingly, laparoscopic hysterectomy
was associated with longer operating room time and cost.
■ Perioperative complications associated with vaginal hysterectomy are rare,
but include the following: hemorrhage, hematoma, bowel injury, lower
urinary tract injury (ureteral and bladder), infection, abscess, vaginal cuff
evisceration, vesicovaginal fistula, complications with anesthesia.
■ Bladder injury (cystotomy) can occur in up to 2% of vaginal hysterectomy
cases and there are some data that show that the risk of this type of injury
is higher with concurrent prolapse procedures.7 Previous cesarean section is
associated with adhesions between the cervix and bladder and can
significantly increase the risk of cystotomy. In these patients, careful
dissection is required. Surgeons should consider using mostly sharp
technique to dissect the bladder off of the cervix as blunt dissection such as
the use of a gloved finger or gauze decreases tactile sensation over the
tissues, increasing the risk of entry into the bladder. Immediate recognition
and repair of a bladder injury is necessary. Closure should be tension-free,
water-tight, and performed in two layers using a No. 2-0 or 3-0 delayedabsorbable suture. The bladder is placed to continuous drainage for 7 to 14
days (depending on size and location of the injury). A cystogram of the
bladder should be performed prior to catheter removal in cases of large
injuries to ensure that there is no leak and that the bladder has been
adequately repaired.
■ The risk of ureteral injury after vaginal hysterectomy (without concurrent
prolapse repair) has been reported to be as high as 0.9%.7 The distal ureter
is the most at risk for injury and the common sites of injury include its
passage under the uterine artery as it travels through the cardinal ligament
complex to enter the bladder, at the level of the infundibulopelvic ligament,
and along the pelvic side wall just above the uterosacral ligament. Ureteral
injury is a rare adverse event and can often be detected intraoperatively if
proper precautions are taken. Failure to detect an injury can lead to
permanent upper urinary tract damage including loss of renal function and
complex genitourinary fistula. Intraoperative cystoscopy is an effective
method of detecting an intraoperative injury, and we recommend routine
cystoscopy after vaginal hysterectomy. Administration of a dye that
changes the color of the urine is often useful to visualize ureteral jets at the
time of cystoscopy. This is not always necessary, as urine jets can be seen
without dye. But if the risk of ureteral injury is high, a dye may be useful
to confirm patency. For a long time, intravenous administration of indigo
carmine was a safe and commonly used technique to visualize ureteral flow.
There has recently been a shortage of this dye, and alternatives have been
used. These include intravenous administration of fluorescein, preoperative
oral administration of phenazopyridine, and bladder instillation with a
hyperosmolar solution such 50% dextrose. In cases where ureteral injury is
suspected, intraoperative urology consultation should be obtained. In most
cases, the ureteral injury occurs in the distal 4 to 5 cm of the ureter, and
this type of injury can usually be repaired with reimplantation of the ureter
into the bladder (ureteroneocystostomy). A ureteral stent is usually left in
place and the bladder is placed on continuous drainage with a Foley
catheter for 10 to 14 days. The stent is removed later and an intravenous
urogram is performed to ensure that there is no stenosis, stricture, or fistula
at the site of the repair.
■ Vesicovaginal fistulae are very rare complications. Patients usually present
with early onset constitutional symptoms and eventually develop watery
drainage from the vagina 10 to 14 days after surgery. If a fistula tract
cannot be visualized on speculum examination or with cystoscopy, a
tampon dye test may be performed. This is done by instilling methylene
blue dye into the bladder and inserting a tampon inside of the vagina. If the
blue dye is noted on the proximal tampon, a bladder fistula is suspected. If
there is no dye noted, a uterovaginal fistula should be ruled out, which canalso be done with a tampon in the vagina using intravenous indigo carmine
or oral phenazopyridine. Alternatively, an intravenous pyelogram or CT
urogram can be done to help diagnose a fistula. If the fistula is small, it
may heal spontaneously with the bladder to continuous drainage for 6 to 12
weeks. Fistulae that do not heal spontaneously, or are complex or large,
will require surgical repair.
Nhận xét
Đăng nhận xét