Basic Characteristics of the Ultrasound Equipment
INTRODUCTION
Performing and successfully completing an ultrasound examination requires multitude of skills
that include the medical knowledge, the technical dexterity, and the know-how to navigate the
various knobs of the ultrasound equipment. Today’s ultrasound machines are complex and quite
advanced in electronics and in post-processing capabilities. Being able to optimize the ultrasound
image is much dependent on the understanding of the basic functionality of the ultrasound
equipment. This chapter will focus on the review of various components of the ultrasound
equipment and the basic elements of image optimization. The following chapter (chapter 3) will
introduce some helpful scanning techniques.
Việc khảo sát siêu âm đòi hỏi nhiều kỹ năng bao gồm kiến thức y khoa, kỹ thuật khéo léo và
biết cách điều chỉnh những nút chức năng của máy siêu âm. Máy siêu âm ngày nay phức tạp và
rất tiến bộ về công nghệ, khả năng hậu xử lý. Việc tối ưu hóa hình ảnh siêu âm phụ thuộc vào
hiểu biết chức năng cơ bản của máy siêu âm. Chương này sẽ tập trung ôn lại những thành phần
của máy và những yếu tố cơ bản của việc tối ưu hóa hình ảnh. Chương tiếp theo (chương 3) sẽ
gới thiệu một số kỹ thuật siêu âm hữu ích.
THE ULTRASOUND EQUIPMENT
Ultrasound technology has changed drastically over the past decade allowing for significant
miniaturization in the design and manufacturing of ultrasound equipment. The spectrum of
ultrasound equipment today includes machines that can fit in the palm of one’s hand and highend machines that can perform very sophisticated ultrasound studies. It is important to note that
before you acquire ultrasound equipment, you should have an understanding of who will be
using the equipment, for which medical purpose it is intended to be used, in which environment
it will be used and how will it be serviced.
Kỹ thuật chế tạo máy siêu âm đã thay đổi mạnh mẽ sau một thập niên vừa qua cho phép thu nhỏ
đáng kể kích thước của máy siêu âm. Sự đa dạng của máy siêu âm ngày nay bao gồm những máy
có thể nằm gọn trong lòng bàn tay, cho đến những máy kỹ thuật cao có thể thực hiện được những
nghiên cứu siêu âm tinh vi. Điều quan trọng cần lưu ý là trước khi sử dụng máy siêu âm, bạn
phải có hiểu biết của người sẽ sử dụng thiết bị cho mục đích y khoa nào mà nó được hướng đến
để sử dụng, thiết bị sẽ được sử dụng trong môi trường nào, và nó sẽ được bảo trì sửa chữa ra sao.
The answer to these important questions will help in guiding you to the appropriate type of ultrasound equipment for the right setting. For instance, ultrasound equipment destined for low-resource (outreach) settings should have special characteristics such as portability, sturdiness and a back-up battery in order to adjust to fluctuation in electricity. Furthermore, ultrasound equipment designed for the low-resource (outreach) setting should be easily shipped for repairs and service.
Trả lời cho những câu hỏi quan trọng này sẽ giúp chúng ta chọn được máy siêu âm phù hợp. Ví
dụ như, máy siêu âm dành cho nơi có nguồn điện không ổn định sẽ có các đặc tính như xách tay,
cứng cáp, và có thể dùng pin để phù hợp với nguồn điện dao động. Hơn nữa, những máy này
được thiết kế sao cho dễ dàng vận chuyển cho sửa chữa và bảo trì.
dụ như, máy siêu âm dành cho nơi có nguồn điện không ổn định sẽ có các đặc tính như xách tay,
cứng cáp, và có thể dùng pin để phù hợp với nguồn điện dao động. Hơn nữa, những máy này
được thiết kế sao cho dễ dàng vận chuyển cho sửa chữa và bảo trì.
Ultrasound Transducers
Ultrasound transducers are made of a transducer head, a connecting wire or cable and a
connector, or a device that connects the transducer to the ultrasound machine. The transducer
head has a footprint region (Figure 2.1) where the sound waves leave and return to the
transducer. It is this footprint region of the transducer that needs to remain in contact with the
body in order to transmit and receive ultrasound waves. A gel is applied to the skin/mucosa
surface of the body to facilitate transmission of ultrasound waves given that sound waves do not
transmit well in air.
Đầu dò siêu âm bao gồm đầu dò, dây đầu dò và ổ kết nối, giúp kết nối đầu dò với máy siêu âm.
Đầu dò có một mặt tiếp xúc (footprint) (Hình 2.1) nơi sóng âm được phát ra và trở về đầu dò.
Mặt tiếp xúc này cần phải tiếp xúc tốt với cơ thể để cho sóng âm dễ dàng lan truyền. Chất gel
được bôi trên bề mặt da/niêm mạc của cơ thể cho sóng âm dễ lan truyền, sóng âm không lan
truyền tốt trong không khí.
Each transducer also has a transducer (probe) marker located next to the
head of the transducer in order to help identify its orientation (Figure 2.2). This probe marker
can be a notch, a dot or a light on the probe’s head. The use of this probe marker in handling the
transducer and its orientation will be further discussed in the following chapter (Chapter 3).
Mỗi đầu dò cũng có một đánh dấu đầu dò (probe marker) nằm ở một
phía của đầu dò nhằm giúp ta định hướng (Figure 2.2). Đánh dấu đầu dò có thể là một khuyết,
một chấm, hoặc một bóng đèn phát sáng ở một bên đầu dò. Dùng đánh dấu đầu dò trong việc
cầm đầu dò và định hướng sẽ được thảo luận kỹ trong chương kế tiếp (Chương 3).
phía của đầu dò nhằm giúp ta định hướng (Figure 2.2). Đánh dấu đầu dò có thể là một khuyết,
một chấm, hoặc một bóng đèn phát sáng ở một bên đầu dò. Dùng đánh dấu đầu dò trong việc
cầm đầu dò và định hướng sẽ được thảo luận kỹ trong chương kế tiếp (Chương 3).
Transducers are produced in an array of shapes, sizes and frequencies and are adapted for
specific clinical applications. In general, transducers for cardiac applications have small
footprints. Vascular transducers have high frequencies and are linear in shape and obstetric and
abdominal transducers are curvilinear in footprint shape in order to conform to the shape of the
abdomen (Figure 2.3).
Đầu dò được chế tạo theo hình dáng, kích thước và tần số và phù hợp với các áp dụng lâm sàng
chuyên biệt. Nhìn chung, đầu dò cho tim có mặt tiếp xúc nhỏ. Đầu dò cho mạch máu có tần số
cao và mặt tiếp xúc phẳng, đầu dò cho sản phụ và vùng bụng có mặt tiếp xúc cong để phù hợp
với vùng khảo sát (Hình 2.3).
chuyên biệt. Nhìn chung, đầu dò cho tim có mặt tiếp xúc nhỏ. Đầu dò cho mạch máu có tần số
cao và mặt tiếp xúc phẳng, đầu dò cho sản phụ và vùng bụng có mặt tiếp xúc cong để phù hợp
với vùng khảo sát (Hình 2.3).

Figure 2.1: Footprint of a curvilinear abdominal
transducer. The footprint region is where the
sound waves leave and return to the transducer.
Hình 2.1: Mặt tiếp xúc của đầu dò cong khảo sát
qua thành bụng. Mặt tiếp xúc là nơi sóng âm đi và
về đầu dò
qua thành bụng. Mặt tiếp xúc là nơi sóng âm đi và
về đầu dò

Figure 2.2: Probe marker of a curvilinear
abdominal transducer. The probe marker is
essential in the proper handling and orientation
of the transducer (discussed in chapter 3).
Hình 2.2: Đánh dấu đầu dò trên đầu dò cong
khảo sát qua thành bụng. Đánh dấu đầu dò giúp
ta cầm và định hướng (được thảo luận trong
chương 3)
khảo sát qua thành bụng. Đánh dấu đầu dò giúp
ta cầm và định hướng (được thảo luận trong
chương 3)

Figure 2.3: Abdominal transducer used for obstetric applications.
Note the curvilinear shape of the footprint, which helps to
conform to the abdominal curvature.
Hình 2.3: Đầu dò qua ngã bụng dùng trong sản khoa. Lưu ý mặt
tiếp xúc cong, giúp dễ tiếp xúc với thành bụng.
tiếp xúc cong, giúp dễ tiếp xúc với thành bụng.
Linear transducers produce sound waves that are parallel to each others with a corresponding
rectangular image on the screen. The width of the image and number of scan lines is uniform
throughout all tissue levels (Figure 2.4). This has the advantage of good near field resolution.
Linear transducers are not well suited for curved parts of the body as air gaps are created
between the skin and transducer (Figure 2.5).
Đầu dò phẳng (linear transducer) tạo ra chùm sóng âm đi song song, cho ra hình ảnh siêu âm có
hình chữ nhật. Chiều rộng của hình và số đường khảo sát là đồng nhất qua tất cả các mô (Hình
2.4). Đầu dò này cho độ phân giải tốt ở vùng gần (phần nông). Đầu dò phẳng không dùng tốt cho
các phần cong của cơ thể vì khí bị chen giữa da và đầu dò (Hình 2.5).
hình chữ nhật. Chiều rộng của hình và số đường khảo sát là đồng nhất qua tất cả các mô (Hình
2.4). Đầu dò này cho độ phân giải tốt ở vùng gần (phần nông). Đầu dò phẳng không dùng tốt cho
các phần cong của cơ thể vì khí bị chen giữa da và đầu dò (Hình 2.5).
Sector transducers produce a fan like image that is narrow near the transducer and increase in
width with deeper penetration. Sector transducers are useful when scanning in small anatomic
sites, such as between the ribs as it fits in the intercostal space, or in the fontanel of the newborn
(Figure 2.6). Disadvantages of the sector transducer include its poor near field resolution and
somewhat difficult manipulation.
Đầu dò rẽ quạt (sector transducer) tạo hình ảnh hình rẽ quạt, hẹp ở vùng gần, rộng ở vùng xa với
độ xuyên thấu sâu hơn. Đầu dò rẽ quạt hữu ích khi khảo sát các vị trí giải phẫu nhỏ, như giữa các
xương sườn vì nó nằm gọn trong khoảng liên sườn, hoặc siêu âm xuyên thóp ở trẻ sơ sinh (Hình
2.6). Nhược điểm của đầu dò rẽ quạt là độ phân giải kém ở vùng gần và có phần khó thao tác.
độ xuyên thấu sâu hơn. Đầu dò rẽ quạt hữu ích khi khảo sát các vị trí giải phẫu nhỏ, như giữa các
xương sườn vì nó nằm gọn trong khoảng liên sườn, hoặc siêu âm xuyên thóp ở trẻ sơ sinh (Hình
2.6). Nhược điểm của đầu dò rẽ quạt là độ phân giải kém ở vùng gần và có phần khó thao tác.

Figure 2.4: Transverse plane of the fetal chest
in the second trimester of pregnancy using a
linear transducer. Note the rectangular screen
image and a good near-field resolution.
Hình 2.4: Lát cắt ngang ngực thai nhi quý II.
Lưu ý khung hình chữ nhật và có độ phân giải
vùng gần tốt.
Lưu ý khung hình chữ nhật và có độ phân giải
vùng gần tốt.

Figure 2.5: Linear transducer used for obstetric
scanning in the late second trimester of pregnancy.
Note the gap produced between the transducer
footprint and the abdominal wall (white arrows). This
can be eliminated by simply applying gentle pressure
on the abdomen.
Hình 2.5: Đầu dò phẳng khảo sát thai cuối quý II. Lưu
ý khoảng trống giữa đầu dò và bụng thai phụ (các mũi
tên trắng). Điều này có thể khắc phục bằng cách ép
nhẹ đầu dò lên vùng bụng cần khảo sát.
ý khoảng trống giữa đầu dò và bụng thai phụ (các mũi
tên trắng). Điều này có thể khắc phục bằng cách ép
nhẹ đầu dò lên vùng bụng cần khảo sát.
Curvilinear transducers are perfectly adapted for the abdominal scanning due to the curvature of
the abdominal wall (Figure 2.3). The frequency of the curvilinear transducers ranges between 2
and 7 MHz. The density of the scan lines decreases with increasing distance from the transducer
and the image produced on the screen is a curvilinear image, which allows for a wide field of
view (Figure 2.7).
Đầu dò cong (curvilinear transducer) lý tưởng cho khảo sát vùng bụng do bề mặt cong của thành
bụng (Hình 2.3). Tần số đầu dò nằm trong khoảng 2 đến 7 MHz. Mật độ các đường khảo sát
giảm dần theo độ sâu khảo sát, hình được tạo thành là một hình cong (curvilinear image), cho
phép có một trường nhìn rộng (Hình 2.7).
bụng (Hình 2.3). Tần số đầu dò nằm trong khoảng 2 đến 7 MHz. Mật độ các đường khảo sát
giảm dần theo độ sâu khảo sát, hình được tạo thành là một hình cong (curvilinear image), cho
phép có một trường nhìn rộng (Hình 2.7).

Figure 2.6: Sector transducer; note the small footprint, which allows for imaging in
narrow anatomic locations such as the intercostal spaces or the neonatal fontanels.
Figure 2.6: Đầo dò rẽ quạt; lưu ý mặt tiếp xúc nhỏ, giúp khảo sát những vị trí giải
phẫu nhỏ như khoảng liên sườn, vùng thóp trẻ sơ sinh.
phẫu nhỏ như khoảng liên sườn, vùng thóp trẻ sơ sinh.

Figure 2.7: Ultrasound image of the fetal head using a curvilinear transducer. Note that
the image is curvilinear in shape (arrows) and has a wide field of view.
Figure 2.7: Hình siêu âm đầu thai nhi sử dụng đầu dò cong. Lưu ý hình có dáng cong
(các mũi tên) và có trường nhìn rộng.
(các mũi tên) và có trường nhìn rộng.
Transvaginal transducers, like other endocavitary transducers, have a small footprint and their
frequencies are typically in the range of 5-12 MHz (Figure 2.8). They are designed to fit in small
endocavitary spaces with the footprint at the top of the transducer (transvaginal) or at the dorsal
aspect of the transducer (rectal). When performing a transvaginal ultrasound examination, a
clean condom, or the digit of a surgical rubber glove, should cover the transvaginal transducer.
Ultrasound gel should be placed inside and outside the protective cover in order to facilitate the
transmission of sound.
Đầu dò qua ngã âm đạo (transvaginal transducer), giống như các đầu dò nội khoang
(endocavitary transducer) khác, có mặt tiếp xúc nhỏ và tần số đầu dò điển hình nằm trong
khoảng 5-12 MHz (Hình 2.8). Chúng được thiết kế cho những khoang nhỏ khớp với mặt tiếp
xúc ở chóp của đầu dò (qua ngã âm đạo) hoặc ở mặt lưng của đầu dò (qua ngã hậu môn). Khi
thực hiện siêu âm qua ngã âm đạo, một bao cao su sạch, hoặc một ngón của găng tay phẫu thuật,
cần được dùng để bao đầu dò. Gel siêu âm cần được bôi ở bên trong và bên ngoài của lớp cao su
bảo vệ để sóng âm dễ dàng lan truyền.
Protocols for ultrasound transducer cleaning should be adhered to in order to reduce the spread
of infectious agents. Both the transabdominal and the transvaginal transducers should be wiped
between ultrasound examinations and disinfection of the transvaginal transducer should be
performed according to national or manufacturer guidelines (1).
Quy trình vệ sinh đầu dò cần được tôn trọng triệt để nhằm giảm nguy cơ lây nhiễm. Cả đầu dò
qua ngã bụng và đầu dò qua ngã âm đạo cần được chùi sạch giữa các lần khảo sát và việc khử
trùng đầu dò âm đạo cần được thực hiện theo hướng dẫn quốc gia hoặc hướng dẫn của nhà sản
xuất (1).
qua ngã bụng và đầu dò qua ngã âm đạo cần được chùi sạch giữa các lần khảo sát và việc khử
trùng đầu dò âm đạo cần được thực hiện theo hướng dẫn quốc gia hoặc hướng dẫn của nhà sản
xuất (1).
Controls of the Ultrasound Equipment
Ultrasound equipment has a wide array of options and features. These features are typically
operated from either the console of the ultrasound equipment, a touch screen monitor or a
combination of both (Figure 2.9). The basic controls that you need to familiarize yourself in the
early stages of ultrasound scanning are the following:
Máy siêu âm có nhiều kiểu dáng và tính năng. Những tính năng được vận hành hoặc từ bàn điều
khiển của máy siêu âm, một màn hình chạm, hoặc cả phối hợp cả hai (Hình 2.9). Những điều
khiển cơ bản mà bạn cần phải hiểu rõ đó là:
khiển của máy siêu âm, một màn hình chạm, hoặc cả phối hợp cả hai (Hình 2.9). Những điều
khiển cơ bản mà bạn cần phải hiểu rõ đó là:
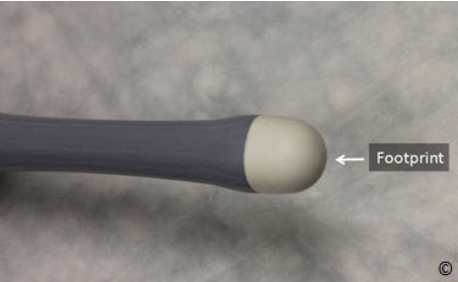
Figure 2.8: The head of a transvaginal transducer; note the small
footprint (labeled) at the top of the transducer.
Hình 2.8: Phần đầu của đầu dò qua ngã âm đạo; lưu ý mặt tiếp xúc
nhỏ tại đỉnh của đầu dò
nhỏ tại đỉnh của đầu dò
Power or Output Control: This controls the strength of the electrical voltage applied to the
transducer crystal at pulse emission. Increasing the power output increases the intensity of the
ultrasound beam emitting and returning to the transducer, thus resulting in increase in signal to
noise ratio. Increasing the power results in an increase in ultrasound energy delivered to the
patient. It is therefore best practice to operate on the minimum power possible for the type of
study needed. Resorting to lower frequency transducers can help achieve more depth while
minimizing power output.
Điều khiển công suất: Điều chỉnh hiệu điện thế dòng điện đến các tinh thể áp điện. Sự gia tăng
công suất làm gia tăng cường độ của sóng âm phát ra và trở về đầu dò, và như thế gia tăng tỷ số
tín hiệu/sóng âm phát ra. Sự gia tăng công suất làm gia tăng năng lượng truyền đến bệnh nhân.
Như thế, tốt nhất là ta vận hành với công suất nhỏ nhất có thể cho loại khảo sát mà ta cần tiến
hành. Sử dụng đầu dò tần số thấp hơn có thể giúp khảo sát sâu hơn đồng thời giảm công suất sử
dụng.
Depth: The depth knob allows you to increase or decrease the depth of the field of view on the
monitor. It is important to always maximize the area of interest on your monitor and decrease the
depth of your field of view, which enlarges the target anatomic organs under view. Figures 2.10
A and B show the importance of depth control in obstetrical scanning.
Độ sâu: Nút điều chỉnh độ sâu (depth) cho phép bạn tăng hoặc giảm độ sâu khảo sát. Điều quan
trọng là bạn phải luôn luôn phóng to vùng cần khảo sát đồng thời giảm độ sâu khảo sát đến mức
có thể, sao cho cấu trúc cần khảo sát to và rõ. Hình 2.10 A và B chỉ cho thấy tầm quan trọng của
việc điều chỉnh độ sâu trong siêu âm sản khoa.
trọng là bạn phải luôn luôn phóng to vùng cần khảo sát đồng thời giảm độ sâu khảo sát đến mức
có thể, sao cho cấu trúc cần khảo sát to và rõ. Hình 2.10 A và B chỉ cho thấy tầm quan trọng của
việc điều chỉnh độ sâu trong siêu âm sản khoa.
Gain: The gain knob adjusts the overall brightness of the image by amplifying the strength of the
returning ultrasound echo. The overall brightness of the image can be increased or decreased by
turning the gain knob clockwise or counterclockwise respectively. Figures 2.11 A and B show
the same ultrasound image under low and high gain settings.
Gain: Nút gain điều chỉnh độ sáng tối của màn hình bằng cách khuếch đại độ mạnh của sóng âm
trở về. Độ sáng chung của hình có thể điều chỉnh tăng hoặc giảm bằng cách vặn nút gain theo
chiều kim đồng hồ hoặc ngược chiều kim đồng hồ. Hình 2.11 A và B cho thấy một hình ảnh siêu
âm với hai mức gain khác nhau.
trở về. Độ sáng chung của hình có thể điều chỉnh tăng hoặc giảm bằng cách vặn nút gain theo
chiều kim đồng hồ hoặc ngược chiều kim đồng hồ. Hình 2.11 A và B cho thấy một hình ảnh siêu
âm với hai mức gain khác nhau.

Figure 2.9: Ultrasound equipment showing a wide array of knobs for
control of various features. Most ultrasound equipment have a
keyboard and a trackball on their consoles.
Hình 2.9: Máy siêu âm cho thấy có nhiều nút điều khiển. Hầu hết
máy siêu âm có một bàn phím và một banh lăn (trackball) trên bàn
điều khiển.
máy siêu âm có một bàn phím và một banh lăn (trackball) trên bàn
điều khiển.
Time Gain Compensation (TGC): The Time Gain Compensation (TGC) allows adjustment of
brightness at a specific depth of the image. The upper knobs increase or decrease brightness
closer to the transducer footprint and the lower knobs increase or decrease brightness farthest
from the transducer footprint. Figure 2.12 shows the TGC location on one of the ultrasound
machine console. As a general rule, in transabdominal ultrasound, the upper field gain knobs
should be kept slightly to the left than lower field ones (in this way the eye of the operator can
focus on the deeper part of the screen where the fetus is). The reverse is true with transvaginal
ultrasound, where the region of interest is often in the near field.
Bù gain theo thời gian (TGC): TGC cho phép điều chỉnh độ sáng tại một độ sâu cụ thể. Những
nút phía trên điều chỉnh tăng – giảm độ sáng vùng nông, những nút phía dưới điều chỉnh tăng –
giảm độ sáng vùng sâu. Hình 2.12 chỉ vị trí điều chỉnh TGC trên bàn điều khiển của một máy
siêu âm. Quy luật chung, trong siêu âm bụng, các nút ở nửa trên cần chỉnh lệch nhẹ về bên trái so
với các nút ở nửa dưới (bằng cách này, mắt của người làm siêu âm có thể thấy rõ phần sâu của
trường nhìn). Quy luật sẽ đảo ngược với đầu dò qua ngã âm đạo, vì vùng cần khảo sát thường
nằm nông.

Figure 2.10 A and B: Figures A and B represent transverse view of the same fetal head at the level of
the biparietal diameter. In A, the depth (white double arrow) is increased, resulting in a small head,
whose anatomic details are consequently difficult to see. In B, the depth is reduced, which allows for a
larger head thus improving visualization.
Hình 2.10 A và B: Hình A và B thể hiện lát cắt ngang đầu thai nhi, lát cắt đo đường kính lưỡng đỉnh. Hình A, độ sâu (mũi tên đôi trắng) gia tăng, kết quả là đầu thai nhi thấy nhỏ, những chi tiết giải phẫu khó nhìn. Hình B, độ sâu giảm, cho phép đầu lớn hơn và như thế giúp nhìn chi tiết giải phẫu tốt hơn.

Figure 2.11 A and B: Figures A and B represent transverse view of the same fetal head at the level of
the cerebellum. In A, the gain is too low and in B, the gain is adequate. Note better visualization of
intracranial anatomy with a higher gain (B). Adjusting the gain to the correct level comes with
experience.
Hình 2.11 A và B: Hình A và B thể hiện lát cắt ngang đầu thai nhi, lát cắt qua tiểu não. Hình A, gain quá thấp và hình B, gain đủ. Lưu ý ta thấy rõ chi tiết não thai nhi với gain cao hơn ở hình (B). Việc điều chỉnh gain ở mức độ tối ưu cần phải có kinh nghiệm.
Focal Zones: The focal zones should always be placed at the depth of interest on the ultrasound
image in order to ensure the best possible lateral resolution. Multiple focal zones can be used to
maximize lateral resolution over depth; however this will result in a slower frame rate and is thus
less desirable when scanning moving structures such as in obstetrics or the fetal heart
specifically.
Vùng tập trung: Vùng tập trung luôn luôn phải được đặt tại độ sâu của vùng cần khảo sát để
chắc chắn có được độ phân giải bên tốt nhất. Nhiều vùng tập trung có thể được chọn để có được
độ phân giải bên tối đa; tuy nhiên điều này sẽ làm giảm tốc độ khung hình, và đây là điều không
mong muốn khi khảo sát các cấu trúc đang chuyển động như thai nhi hoặc tim thai.
chắc chắn có được độ phân giải bên tốt nhất. Nhiều vùng tập trung có thể được chọn để có được
độ phân giải bên tối đa; tuy nhiên điều này sẽ làm giảm tốc độ khung hình, và đây là điều không
mong muốn khi khảo sát các cấu trúc đang chuyển động như thai nhi hoặc tim thai.
Freeze: The freeze knob allows the image to be held (frozen) on the screen. While the image is
frozen measurements can then be taken and organ annotations can be applied to the image before
saving it. Furthermore, the option to “cineloop” (scroll) back to previous time frames is an option
that is available on most ultrasound equipment. This is a very important function in obstetric
ultrasound imaging, as it assists in capturing frames during fetal movements, such as
measurement of long bones.
Nút dừng hình: Nút này cho phép hình dừng lại (đóng băng) trên màn hình. Trong lúc hình
dừng lại ta có thể đo đạc, ghi chú tên cấu trúc lên màn hình trước khi lưu hình. Hơn thế, chức
năng “cineloop” (lăn ngược banh lăn – trackball - để xem lại những hình siêu âm ngay trước đó)
là một tùy chọn, mà có sẵn trên hầu hết máy siêu âm. Đây là một chức năng rất quan trọng trong
siêu âm sản khoa, vì nó trợ giúp trong việc bắt giữ những khung hình trong suốt quá trình chuyển
động của thai nhi, như việc đo đạc các xương dài.
Trackball: The Trackball or Mouse pad is used for moving objects on the monitor and for
scrolling back in freeze mode. It has a multi-function and can be used in conjunction with caliper
placement, screen annotation, or moving the zoom or Doppler boxes to the desired location.
Banh lăn (trackball): Banh lăn được dùng để chuyển động những vật thể trên màn hình và cho
chuyển động ngược banh lăn trong mode dừng màn hình. Nó có nhiều chức năng như dịch
chuyển thước đo, ghi chú trên màn hình, dịch chuyển vùng phóng đại hoặc dịch chuyển hộp màu
tới vị trí mong muốn.
chuyển động ngược banh lăn trong mode dừng màn hình. Nó có nhiều chức năng như dịch
chuyển thước đo, ghi chú trên màn hình, dịch chuyển vùng phóng đại hoặc dịch chuyển hộp màu
tới vị trí mong muốn.
Res or Zoom: Some ultrasound equipment has this function, which allows magnification of
areas of the ultrasound image displayed on the monitor in real time. The trackball is used in
conjunction with the Res/Zoom knob to choose the area for magnification.
Phóng to (zoom): Một số máy siêu âm có chức năng này, nó cho phép phóng to một vùng cần
khảo sát lên màn hình theo thời gian thực (real time). Banh lăn được dùng kết hợp với nút này để
chọn vùng cần phóng to.
khảo sát lên màn hình theo thời gian thực (real time). Banh lăn được dùng kết hợp với nút này để
chọn vùng cần phóng to.
2-D: The 2-D knob stands for the 2-D mode of scanning or the traditional B-mode imaging. B
stands for brightness (mode). In this mode, the image is displayed in grey scale and is comprised
of pixels arranged in a sector or linear fashion with various shades of grey thus representing the
intensity of the returning signal (Figure 2.13). When the operator presses this knob, the
traditional 2-D image is activated. This knob is also used to get back to grey scale imaging from
color Doppler and/or Pulsed Wave Doppler.
Mode 2D: Nhấn nút 2D khi làm siêu âm B-mode truyền thống. Đây là mode sáng –tối. Trong
mode này, hình ảnh thể hiện trên thang độ xám bao gồm những điểm ảnh (pixel) sắp xếp cạnh
nhau theo kiểu rẽ quạt hoặc song song với nhiều sắc độ xám, thể hiện cường độ của tín hiệu hồi âm (Hình 2.13). Khi ngưởi làm siêu âm nhấn nút này, hình ảnh 2D truyền thống sẽ được kích
hoạt. Nút này cũng được dùng để quay trở lại mode 2D từ mode Doppler màu và/hoặc Dopplermode này, hình ảnh thể hiện trên thang độ xám bao gồm những điểm ảnh (pixel) sắp xếp cạnh
nhau theo kiểu rẽ quạt hoặc song song với nhiều sắc độ xám, thể hiện cường độ của tín hiệu hồi âm (Hình 2.13). Khi ngưởi làm siêu âm nhấn nút này, hình ảnh 2D truyền thống sẽ được kích
xung.

Figure 2.12: Time Gain Compensation (TGC) on an ultrasound consol. The upper and
lower knobs adjust brightness in the upper and lower fields respectively (labeled). The
overall knob (labeled) adjusts brightness in the whole image.
Hình 2.12: Bù gain theo thời gian (TGC) trên bàn điều khiển máy siêu âm. Những nút
phía trên (upper field) và phía dưới (lower field) điều chỉnh độ sáng theo thứ tự. Nút
chung (overall) giúp chỉnh sáng – tối toàn màn hình.
phía trên (upper field) và phía dưới (lower field) điều chỉnh độ sáng theo thứ tự. Nút
chung (overall) giúp chỉnh sáng – tối toàn màn hình.
M-Mode: The M-Mode knob activates the M-Mode function of the ultrasound machine. MMode stands for Motion mode and in this function an M-Mode cursor line appears on the upper
section of the image with an M-Mode display on the lower part of the image (Figure 2.14). The
M-Mode display corresponds to the anatomic components that the M-Mode cursor intersects.
The M-Mode is used primarily to document motion, such as cardiac activity of the fetus in early
gestation (Figure 2.15).
M-Mode: Nút M kích hoạt chức năng M-Mode của máy siêu âm. M-Mode có nghĩa là mode
chuyển động và trong chức năng này một đường M-Mode xuất hiện ở phần trên của hình với MMode thể hiện ở phần dưới của hình (Hình 2.14). Hình M-Mode thể hiện tương ứng với cấu trúc
giải phẫu mà tia M-Mode cắt qua. M-Mode được dùng chủ yếu để đánh giá chuyển động, như
hoạt động của tim thai giai đoạn sớm (Hình 2.15).

Figure 2.13: Two-dimensional ultrasound image of the fetal chest at the level of the fourchamber view. Note the various gradation of grey with the ribs being the brightest (echogenic)
followed by the lungs and heart (labeled). The amniotic fluid (AF) is black in color (anechoic)
reflecting a weak intensity of the returning echo.
Hình 2.13: Hình siêu âm 2D ngực thai nhi, lát cắt ngang 4 buồng tim. Lưu ý nhiều mức độ xám
với xương sườn sáng nhất (hồi âm dày) nằm sau phổi và tim (ribs). Nước ối (AF) hồi âm trống
(anechoic) phản ánh cường độ yếu của sóng hồi âm.
với xương sườn sáng nhất (hồi âm dày) nằm sau phổi và tim (ribs). Nước ối (AF) hồi âm trống
(anechoic) phản ánh cường độ yếu của sóng hồi âm.

Figure 2.14: M-Mode cursor line (dashed line) is shown through the fetal heart
(small bracket) in the upper image. Note the corresponding M-Mode display (large
bracket) in the lower image showing cardiac motion.
Hình 2.14: Đường M-Mode (đường chấm) cắt ngang qua tim thai (dầu ngoặc nhỏ) ở
phần trên của hình. Lưu ý M-Mode thể hiện (dấu ngoặc lớn) ở phần dưới chỉ hoạt
động của tim
phần trên của hình. Lưu ý M-Mode thể hiện (dấu ngoặc lớn) ở phần dưới chỉ hoạt
động của tim
Color Flow: The color flow knob activates color flow or color Doppler, which adds a box
superimposed on the 2-D real-time image on the screen. The operator can control the size and
location of the color box on the 2-D image. Color flow or color Doppler detects blood flow in the
insonated tissue and assigns color to the blood flow based upon the direction of blood flow. By
convention, red is assigned for blood flow moving in the direction of the transducer (up) and
blue is assigned for blood moving in the direction away from the transducer (down).
Mode Dopper màu: Nút CF kích hoạt mode Doppler màu, lúc này ta thấy xuất hiện thêm một
hộp màu chồng lên hình 2D theo thời gian thực (real-time). Người làm siêu âm có thể điều chỉnh
kích thước và vị trí của hộp màu trên hình 2D. Doppler màu giúp phát hiện dòng chảy trong mô
và màu của dòng chảy được mã hóa dựa vào hướng chảy của nó. Theo quy ước, dòng chảy
hướng về đầu dò được mã hóa màu đỏ, chạy xa đầu dò mã hóa màu xanh.
The operator can also control the velocity scale of blood flow (pulse repetition frequency) and the
filter or threshold of flow. These parameters are important in assessing various vascular beds.
Note that the display of color flow follows the physical principles of Doppler flow and thus if the
ultrasound beam is perpendicular to the direction of flow, color Doppler information will not be
displayed on the monitor (see chapter 1 for details). Newer ultrasound equipment tries to
overcome this limitation by providing other means for display of blood flow such as Power
Doppler which primarily relies on wave amplitude and B-flow (not to be confused with BMode) both of which are relatively angle independent.
Người làm siêu âm cũng có thể điều chỉnh thang vận tốc (velocity scale, PRF- pulse repetition frequency) và độ lọc thành (wall filter). Những thông số này đóng vai trò quan trọng trong đánh giá giường mạch máu. Lưu ý rằng dòng chảy màu tuân thủ nguyên tắc Doppler và vì thế nếu chùm tia siêu âm đi vuông góc với dòng chảy, thông tin Doppler màu sẽ không thể hiện trên màn hình (xem chi tiết
trong chương 1). Máy siêu âm thế hệ mới cố gắng khắc phục nhược điểm này bằng cách bổ sung
thêm các mode mới như Doppler năng lượng (Power Doppler) phản ánh chủ yếu biên độ sóng
âm và Dòng chảy trên B-Mode (B-flow) (đừng lầm với B-Mode), hai mode này không phụ
thuộc góc Doppler.
trong chương 1). Máy siêu âm thế hệ mới cố gắng khắc phục nhược điểm này bằng cách bổ sung
thêm các mode mới như Doppler năng lượng (Power Doppler) phản ánh chủ yếu biên độ sóng
âm và Dòng chảy trên B-Mode (B-flow) (đừng lầm với B-Mode), hai mode này không phụ
thuộc góc Doppler.
Pulsed Wave Doppler: The pulse wave Doppler (Pulsed Doppler) or Spectral Doppler knob
activates the pulse Doppler display. In this display a cursor line with a gate appears in the upper
half of the screen and a pulse or spectral Doppler display appears in the lower half of the screen
(Figure 2.16). The pulsed wave Doppler gate can be moved by the operator and placed within a
vessel as imaged by color Doppler. Typically, this mode is activated when a vessel is first
identified or suspected and after color flow Doppler is activated.
Mode Doppler xung hoặc Dopper phổ (Pulsed Wave or Spectral Doppler) nút PW kích hoạt
mode Doppler xung. Trong mode này, một tia Dopper xung kèm một cửa sổ Doppler (gate) xuất
hiện ở nửa trên của màn hình (Hình 2.16). Cửa sổ Doppler có thể được dịch chuyển bởi người
làm siêu âm và được đặt trong lòng mạch nhờ hình ảnh Doppler màu. Mode này thường được
kích hoạt sau khi mode Doppler màu xác định dòng chảy
Pulsed Doppler allows
obtaining specific quantitative information about a vessel such as S/D ratio of the umbilical
artery (Figure 2.17). Flow towards the transducer is displayed above the baseline and flow away
from the transducer is displayed below the baseline. The operator has the option to invert the
display of the Doppler spectrum in order to display the waveforms above the line (Figure 2.16).
See chapter 1 for more details.
Doppler xung cho những thông tin
định lượng về mạch máu như tỷ lệ Tâm thu/Tâm trương (P/S ratio) của động mạch rốn (Hình
2.17). Dòng chảy hướng về đầu dò thể hiện trên đường nền và chạy xa đầu dò thể hiện dưới đường nền. Người làm siêu âm có thể đảo ngược phổ Doppler để nó thể hiện trên đường nền
(Hình 2.16). Xem chi tiết trong chương 1.
định lượng về mạch máu như tỷ lệ Tâm thu/Tâm trương (P/S ratio) của động mạch rốn (Hình
2.17). Dòng chảy hướng về đầu dò thể hiện trên đường nền và chạy xa đầu dò thể hiện dưới đường nền. Người làm siêu âm có thể đảo ngược phổ Doppler để nó thể hiện trên đường nền

Figure 2.15: M-Mode applied in the first trimester for documentation of fetal heart
activity. Reflections in the M-Mode tracing (asterisks) represent cardiac motion.
Calipers are measuring fetal heart rate (FHR) at 144 beats per minute (bpm).
Hình 2.15: Hình M-Mode quý I ghi nhận hoạt động của tim thai. Những vết phản
chiếu trên M-Mode (các hoa thị) thể hiện hoạt động tim thai. Thước đo đo tần số
tim thai (Fetal Heart Rate - FHR) là 144 lần trên phút (beats per minute - bpm).
chiếu trên M-Mode (các hoa thị) thể hiện hoạt động tim thai. Thước đo đo tần số
tim thai (Fetal Heart Rate - FHR) là 144 lần trên phút (beats per minute - bpm).

Figure 2.16: Pulsed wave Doppler of the umbilical artery. Note that the Doppler gate
is placed within the umbilical artery as seen in the upper part of the image and the
spectral Doppler waveform is displayed in the lower part of the image. The spectral
Doppler is inverted to display the waveforms above the line.
Hình 2.16: Doppler xung động mạch rốn. Lưu ý cửa sổ Doppler (gate) được đặt trong
động mạch rốn như thấy trong nửa trên hình và phổ Doppler thể hiện ở nửa dưới
của hình. Phổ Doppler được đảo ngược để thể hiện trên đường nền.
động mạch rốn như thấy trong nửa trên hình và phổ Doppler thể hiện ở nửa dưới
của hình. Phổ Doppler được đảo ngược để thể hiện trên đường nền.

Figure 2.17: Pulsed wave Doppler of the umbilical artery at the abdominal
insertion. Doppler waveforms are shown in blue color. S stands for flow at peak
systole and D stands for flow at end diastole. Note the Doppler indices in the
right upper corner of the image (yellow). For more details, refer to Chapter 1.
Hình 2.17: Doppler xung động mạch rốn tại chỗ cắm vào thành bụng. Phổ
Doppler có màu xanh. S là vận tốc đỉnh tâm thu, D là vận tốc cuối tâm trương.
Lưu ý các chỉ số Doppler trên góc phải của màn hình (vàng). Chi tiết hơn, xin đọc
chương 1.
Doppler có màu xanh. S là vận tốc đỉnh tâm thu, D là vận tốc cuối tâm trương.
Lưu ý các chỉ số Doppler trên góc phải của màn hình (vàng). Chi tiết hơn, xin đọc
chương 1.
Measurement: The measurement function or knob can also be displayed as Measure or Cal
(Calculation) on the ultrasound console. This function allows the operator to measure, in
different formats, various objects on the screen. When the measure button is pressed, a caliper
appears on the screen. Use the trackball to move the caliper to the desired location and set it.
Once set, a second caliper appears, which can be set in similar fashion. Stored normograms
within the ultrasound equipment allow for determination of gestational age and estimation of
fetal weight when various fetal biometric parameters are measured
Đo đạc: Chức năng đo đạc được kích hoạt khi nhấn nút Measure hoặc Cal (Calculation) trên bàn
điều khiển. Chức năng này cho phép người làm siêu âm đo đạc với những định dạng khác nhau,
những cấu trúc khác nhau trên màn hình. Khi nhấn nút này, một thước đo xuất hiện trên màn
hình. Sử dụng banh lăn (trackball) để di chuyển thước đo đến vị trí mong muốn và nhấn chọn
(set). Một khi đã nhấn chọn, một thước đo thứ hai xuất hiện, và ta có thể tiếp tục đo đạc. Những
biểu đồ, dữ liệu cài đặt trong máy cho phép ta xác định tuổi thai và ước tính cân nặng thai nhi
sau khi đo đạc những thông số cần thiết.
STARTING AN EXAMINATION
Before starting an ultrasound examination, it is important to ensure that essential information
about the patient is entered into the ultrasound equipment in order to be able to save ultrasound
images on the hard drive of the ultrasound machine, accurately calculate gestational age in
pregnancy and print ultrasound images for documentation purposes. Minimal relevant
information that is required to be entered includes the patient’s name, date of birth and first day
of the last menstrual period. On many ultrasound equipment, a knob identified as “Patient or
Start” leads you to this screen where this information can be entered (Figure 2.18). If you do not
enter this information or any other patient identifier at the initiation of your examination (patient
name); most ultrasound systems will not allow you to print or save an image from your
examination.
Trước khi tiến hành siêu âm, điều quan trọng cần phải chắc chắn rằng những thông tin thiết yếu
về bệnh nhân phải được nhập vào máy siêu âm để có thể lưu hình vào ổ cứng của máy siêu âm,
tính toán chính xác tuổi thai và in hình siêu âm cho mục đích làm bằng chứng. Những thông tin
tối thiểu cần phải được nhập vào bao gồm tên bệnh nhân, ngày tháng năm sinh và ngày đầu của
kỳ kinh cuối. Trên nhiều máy siêu âm, có nút “Patient hoặc Start” giúp bạn điền những thông tin
này (Hình 2.18). Nếu bạn không nhập những thông tin này hoặc không có tên bệnh nhân; phần
lớn máy siêu âm không cho phép bạn in hoặc lưu hình từ khảo sát của bạn.
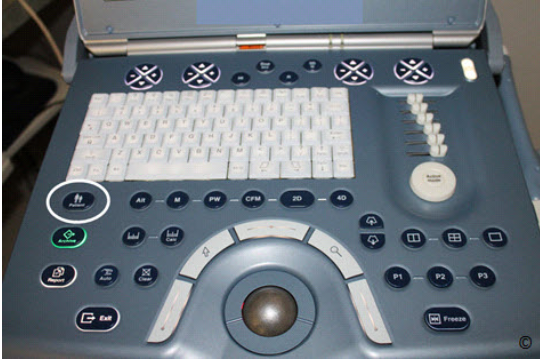
Figure 2.18: Consol of an Ultrasound equipment showing the knob identified as
“Patient” (white circle), which leads you to a screen on the monitor (not shown)
where patient identifiers are entered before initiating the ultrasound
examination.
Hình 2.18: Bàn điều khiển của một máy siêu âm có nút “Patient” (vòng trắng),
giúp bạn điền thông tin trên màn hình (không hiển thị ở đây) nơi thông tin của
bệnh nhân được nhập vào trước khi tiến hành siêu âm.
giúp bạn điền thông tin trên màn hình (không hiển thị ở đây) nơi thông tin của
bệnh nhân được nhập vào trước khi tiến hành siêu âm.
When a patient returns for a follow-up examination, modern ultrasound equipment allows you to
retrieve the patient information automatically without a need to reenter the data.
Khi bệnh nhân tái khám siêu âm, máy siêu âm hiện đại cho phép bạn tự động lấy lại thông tin
của bệnh nhân mà không cần nhập dữ liệu trở lại.
của bệnh nhân mà không cần nhập dữ liệu trở lại.
DOCUMENTING AN EXAMINATION
An ultrasound report is required at the conclusion of the ultrasound examination. Chapter 15
details the parameters of an ultrasound report in obstetrics and gynecology. It is important to
know that image documentation is an essential component of the ultrasound examination and
report. Images can be produced in paper format or stored digitally on the ultrasound equipment.
Several ultrasound systems have knobs for images, which can be formatted to allow for printing
on a thermal printer and for saving a digital copy in a DICOM format on the equipment hard
drive.
Báo cáo siêu âm được làm sau mỗi khảo sát. Chương 15 cho biết chi tiết những thông số trong
báo cáo siêu âm sản – phụ khoa. Điều quan trọng cần biết là hình ảnh bằng chứng là một phần
quan trọng của khảo sát và báo cáo siêu âm. Hình ảnh có thể được in trên giấy hoặc lưu bằng kỹ
thuật số trên máy siêu âm. Nhiều máy siêu âm có nút in hình siêu âm, cho phép in trên giấy nhiệt
hoặc lưu kỹ thuật số chuẩn DICOM trong ổ cứng của máy siêu âm.
The operator also has the option of downloading and saving a study on an external hard
drive or a USB jump drive. This is an important function in the low-resource setting as it allows
for exchange of cases for educational and consultative function. Typically these knobs can be
formatted for these functions, such as for thermal paper printer, for saving on the hard drive and
for downloading to the USB outlet. A permanent copy of the ultrasound report, including
ultrasound images, should be kept and stored in accordance with national regulations.
Người làm siêu âm cũng có
thể lưu hình trên ổ cứng ngoài hoặc lưu vào USB. Đây là một chức năng quan trọng cho giáo dục
và tư vấn. Thường sẽ có những nút chức năng cho việc in giấy nhiệt, lưu ổ cứng, lưu vào USB.
Sao lưu dữ liệu thường xuyên các báo cáo siêu âm, bao gồm hình ảnh siêu âm theo quy định
quốc gia.
thể lưu hình trên ổ cứng ngoài hoặc lưu vào USB. Đây là một chức năng quan trọng cho giáo dục
và tư vấn. Thường sẽ có những nút chức năng cho việc in giấy nhiệt, lưu ổ cứng, lưu vào USB.
Sao lưu dữ liệu thường xuyên các báo cáo siêu âm, bao gồm hình ảnh siêu âm theo quy định
quốc gia.
References:
1) American Institute of Ultrasound in Medicine (AIUM) Guidelines for Cleaning and
Preparing Endocavitary Ultrasound Transducers Between Patients (Approved 6/4/2003) –
http://www.aium.org/officialStatements/27
Nhận xét
Đăng nhận xét